Showing posts with label Green Woodworking. Show all posts

Tuesday, July 4, 2017

How Now Black Cow - Sparkle arrives

Having learnt a very hard lesson with the demise of Hailey, our poddy cow, we were determined that if we had another cow, that we wouldn't make the same mistakes. Cows in calf need lots of feed. Our cow did not find enough grass to eat in our drought-stricken paddocks and our supplementary feed was not enough to sustain a cow and growing calf.
So when a friend offered us their spare pregnant heifer we were cautious and sought lots of advice. We decided to exchange the meat from one of our pigs for a fresh start with their heifer. 
Rainbow Sparkle may be black but she has plenty of Jersey in her.  


She is about 18 months old and she is due to have her first calf in October. Our cow expert told us that she is a little undernourished (her head is big for her body) but that she is healthy and should be a fine cow if we feed her enough. So we are feeding her a large bucket of lucerne chaff, some grain, some beef nuts mixed with some molasses twice a day. During the rest of the time she has access to unlimited fresh grass hay. She has a goat companion, Flossie, to stave off any loneliness and plenty of water.


Although she had been near humans she had never been handled. It took two days to get her comfortable with me touching her head and a week to be able to touch her all over. Last night I approached her from behind and she responded by lashing out with her foot. Luckily it hit a post and not my leg, but it reminded me that she still has a 'flight' zone and that if she cannot see me approach she will be much more wary.
She now eats in the dairy and my plan for the next couple of weeks is to get her eating in the stall comfortably. Then I can try the head bail.
The kids decided that she didn't quite fit the name 'Rainbow Sparkle' so she has been shortened to Sparkle or even Sparky.
If all goes well we may have raw milk once again come October.

Tuesday, April 5, 2016

Spoon carving and turning


"Made in the Woods" is a biannual event where traditional skills are taught and practised in a bush setting. I have attended three over the past few years and I find I am always drawn to spend lots of time with the spoon carver, Jeff. He is the one in the traditional terry towelling hat. He spends about half his time earning money from teaching spoon carving workshops in Australia and this year will be presenting at Spoonfest in England. Check him out at www.spoonsmith.com.au.
Anyway, the basic skill is to split a log into about four or more sections. This is shaped roughly with a very sharp axe or tomahawk. Finer cutting is done either with a draw knife on a shaving horse or pony or a sharp hand knife. I love the shaving horse so I tend to hog that for making my spoons. The horse is the device to the right where the guy is seated. His feet are pushing a slide that grips the wood near his hands so he can shape it by drawing the two handed draw knife towards him. For protection from these sharp tools he is wearing a leather apron.
 
 
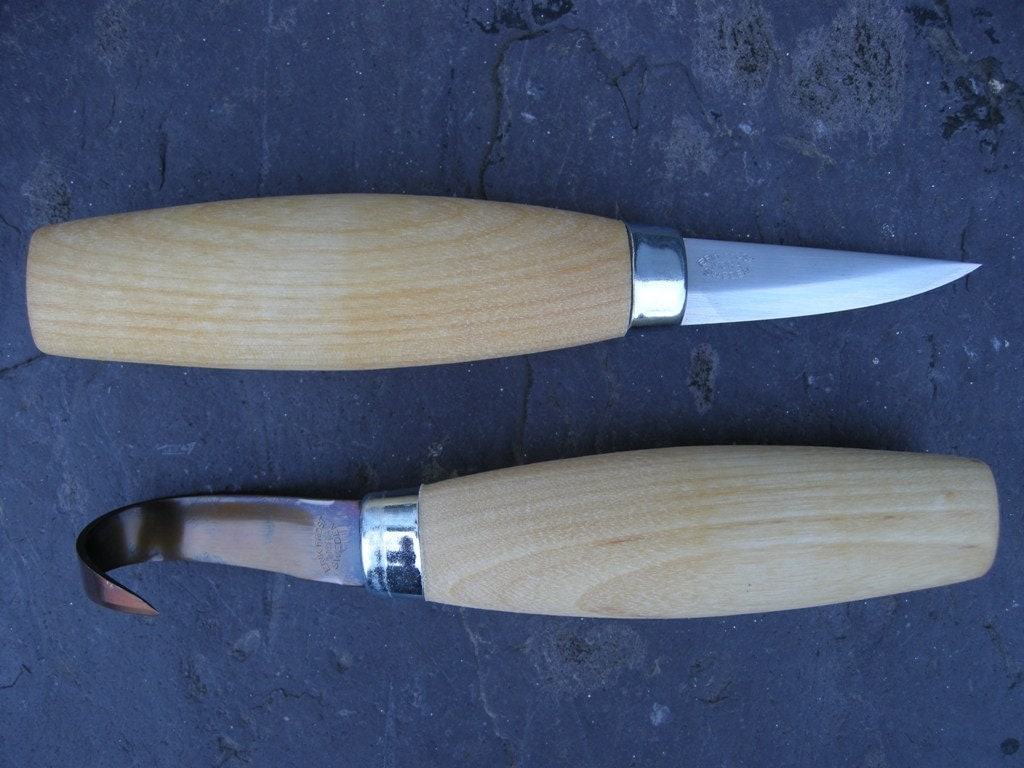
The final part of making the spoon is to use a hook knife (one with a specially made curved blade) the helps to gouge the concave bowl of the spoon from the wood. This gives you blisters but makes the spoon come to life.
 
Another traditional tool used by Jeff is the pole lathe. Following my first time at "Made in the Woods" I returned to Opportunity Farm so fired up with enthusiasm I constructed my own shaving horse and a pole lathe. I haven't made much time to use it since so on this workshop I was determined to have a go.


The lathe is powered by your foot that pushes down on a pedal and turns the wood which is pulled back up traditionally by a springy pole (hence the name) or in a more modern way, an elastic cord. The trick is to scrape the turning branch with a sharp tool on the downward push and then ease on while it is turned back by being pulled upwards.  Here I made a ring by cutting in from both sides until the ring came clear but was trapped by wider wood on each side.

 
This is the wood after being removed from the lathe. The bolus has been sawn off above the shaft ready for gouging out with the hook knive. The ring is purely decorative but it was a good exercise in using the lathe. Since my return to Opportunity Farm I have set up my lathe and have a turn whenever I make the time.

Making Bush Furniture

I spent an weekend with a bunch of amazing people all interested or skilled in traditional crafts. Set up in a clearing in the bush we five crafts: blacksmithing, weaving, spinning and dieing, spooncarving and bush furniture making. I spent time with most of these but this post focuses on the construction of bush furniture.
 
 
This is the start of a rustic bench seat. First a slab was hewn with a hand saw from a dry log. then four short legs were cut and the ends shaped with a draw knife to the same diameter. Four holes were angled in the base with an auger. Each leg had a split cut in the shaped end and a wedge placed in the top of the split. When the legs were fitted and driven home the wedge caused the leg to grip tightly.
 
 
The bench now has its legs and two slots were augered into the top for the back of the seat. The slots were made with two auger holes side by side with the middle chiselled out.


This lady made a ladder out of green timber. The frame was made by splitting a straight length of branch in half. The ends of the rungs were all shaped on the shaving horse (below) to the diameter of the auger holes. Once these were fitted a peg was hand made to keep the ladder together.
 
 
A ladder rung being shaped on the shaving horse.


This guy made a stool. The seat was cut as a slab from a dry piece of hardwood. Three legs were shaped with the draw knife and slotted into holes augered all the way through the seat. Three other pieces of green wood were cut to keep the legs apart and rigid.

 
The legs were pushed up through the holes to sit proud of the seat. A slit was cut in each one and a wedge driven into to seat level. The slits had to be cut perpendicular to the edge of the seat or the corner could snap off.  Any part of the leg still above the seat level was cut off.

 
The completed stool.


Saturday, May 2, 2015

Using Homegrown Timber

 
With over 300 acres of forest on our bush block wood is a resource we have in spades. Aside from firewood collection there are plenty of uses we have found. All the framing on this caravan shed was cut from the property and held together with strapping and clouts. As with fence posts the best timber is Red Box (Eucalyptus Polyanthemos) which is almost termite resistant. Luckily the geology of our site means that there are plenty of these trees close to the house.


 Our homemade house was constructed in two parts. One is mudbrick made from soil dug to create the space for the house with timber poles holding up the roof. The second part was made from local timber milled 35km up the road but the verandah posts were cut from a Blue Gum thicket about 100m below the house. Once the bark dried off the paths of borers were revealed showing a beautiful pattern as a feature.

 
We also used radially sawn timber - a technique designed to get the maximum amount of wood out of the saw log. Each piece also has an uneven edge on the thickest part that looks more natural and organic.


We have also used our timber for green woodworking and more recently spoon carving. It is still a fantastic renewable resource despite most of it being singed or burnt in last year's major bushfire. If time allows I would love to use it more - making shingles would be a project I am keen to try.

Wednesday, April 1, 2015

Spooncarving

Some days the farm work can take a back seat and we make time for something creative. I love working with wood so last year I went on a weekend course on how to carve spoons. For more info on these courses check out www.spoonsmith.com 
Green woodworking is when freshly cut timber is used. For making a spoon moisture is needed to make the carving easier. The timber can be cut up well beforehand but is best kept in a moist place such as the fridge until you are ready to carve.
This morning I cut down a young silvertop ash tree and removed a round about 30cm long and 10cm in diameter. I split this in half lengthways using an axe and wooden mallet - it is always best not to strike metal on metal.
Each of these pieces were roughly axed into a spoon shape - narrower on the handle end and curved on the spoon end.
 

We put on the leather aprons Michelle made from one of our goatskins and shaped the wood further with a very sharp knife. We realized that having a glove on the hand holding the wood would reduce the need for bandaids and blisters. The aprons worked very well at protecting our bodies from cuts.
Once the outline of the spoon had taken shape we reached for the specially shaped spoon carving tools.
You can get left and right handed spooncarving tools but despite my being a lefty we have two right handed ones. My searching could not find any made in Australia so they were imported from England which seems to be the home of Green Woodworking.
It takes a while to get the spooncarving knife working well across the grain to make an indent but once enough shavings are scooped out it scrapes smoothly and effectively.
We ran out of time to complete the spoon shaping but they are in the fridge ready for next time.